 Most online entrepreneurs understand how important keyword research is. It’s good way to discover potential new niches or come up with fresh post topic ideas. Some people compare it to gold mining…doing keyword research can be addictive!
There are quite a few keyword research tools out there..some better than others. Of course you could pay for a premium tool like Market Samurai. But the Google Adwords keyword research tool is a great, free way to find new ideas. Use it to conduct your own research through trial and error, without having to commit money to a paid program. And you can always move on to a premium tool later on.
When I first started using Adwords,I was overwhelmed with the amount of data. And I wasn’t sure how to organize it. Downloading large amounts of data all at once complicates things. If you aren’t organized, it can be easy to lost track of it all. Luckily, Google provides the tools you need to conduct keyword research quickly and efficiently.
Getting Your Data with Google Tools
This isn’t a post about analyzing keyword groups, exactly. There are tutorials on the web that can show you how to interpret the Cost Per Click (CPC) and Competition data. In this post I’ll show you a quick and easy way to pull data from Google Adwords, then organize and use the data to your advantage.
Step 1) Create a Gmail account. If you don’t already have one, open a Gmail account. You can use Google Keyword research without an account. But you’ll need to use Google Apps later on, so it’s best to open one up now.
Step 2) Open Google Drive. Gmail gives you access to Google Drive. You’ll be using Drive to store and organize your keywords in a spreadsheet.
Step 3) Create Folder & Documents. Create a new folder in Google Drive. Name it whatever you want. In this case I named mine “security guard research.” Once you’ve got the folder open, create two new Google docs…one spreadsheet and one document file.
Step 4) Create an AdWords account. This will be tied to your Gmail account. Once you’ve got that setup, open the Keyword Tool under Tools and Analysis.
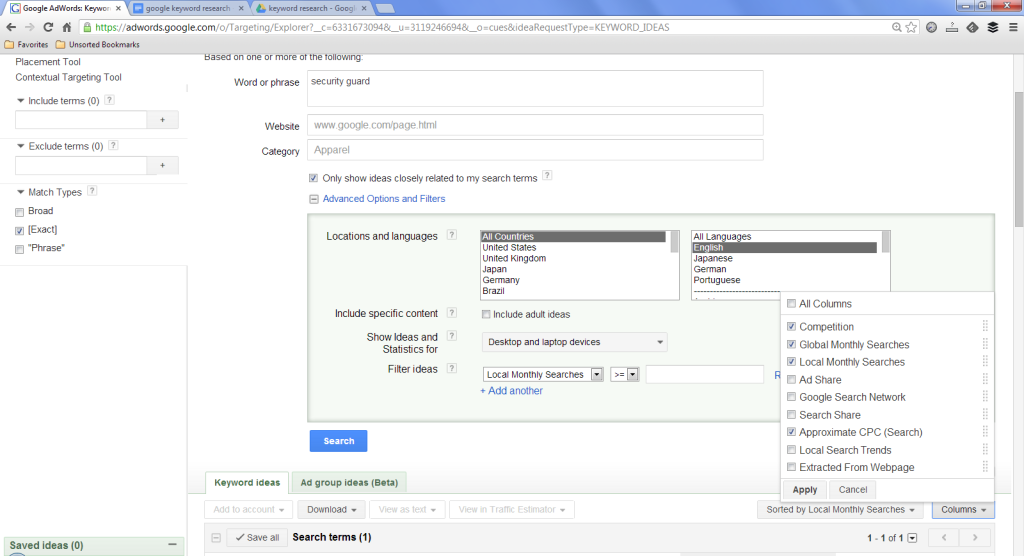
Step 5) Keyword Research Settings. Now, it’s time to conduct the actual research. Make sure you have the right settings in place. Here’s what you’ll want to adjust:
- Match type = Exact
- Countries/Languages = United States/English, for my searches. Adjust to fit your needs.
- Filters = Filter down for more specific searches, minimum search volume, CPC, etc.
- Columns = This box is in the bottom left part of the screen. Check off Global Competition, Monthly Searches, Local Monthly Searches, and CPC columns so that they display when you conduct your search.
Step 6) Search for keywords. Some researchers recommend targeting long tail keywords. That means targeting strings of three or more words. For example, a short tail keyword would be “security guard.” And a long-tail keyword variation might be “security guard training in texas.” It’s easier to rank higher in search engines for long tail keywords. So, it’s a good idea to focus on them first. Type in a word or phrase to begin your research. In this case, I’ve use “security guard.” I wouldn’t try to target that keyword at first. But if you scroll down, it gives you some interesting long-tail variations. Take a look:
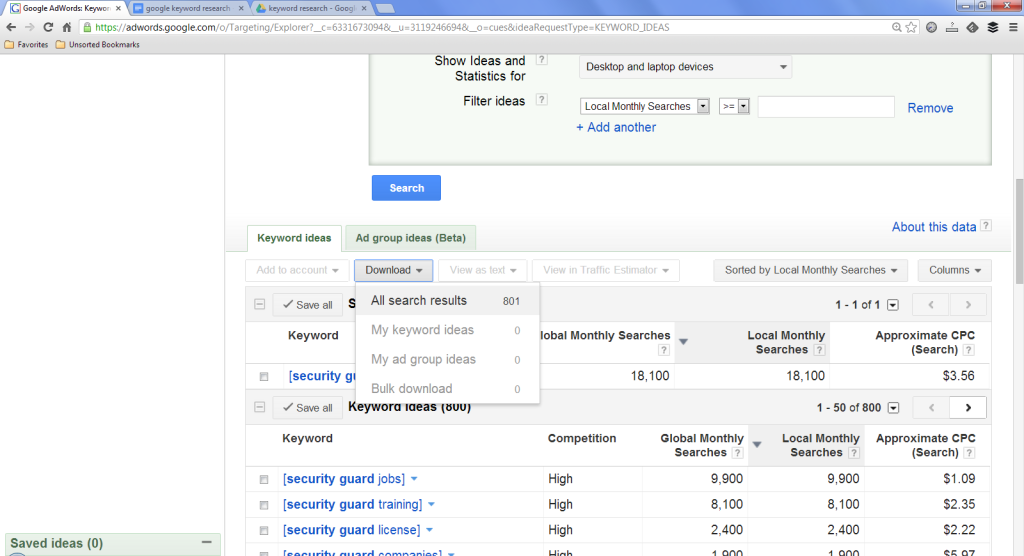
I like to sort the search by Global or Local monthly searches. As you can see, this list gives you some good keyword phrase ideas along with competition, volume, and CPC data.
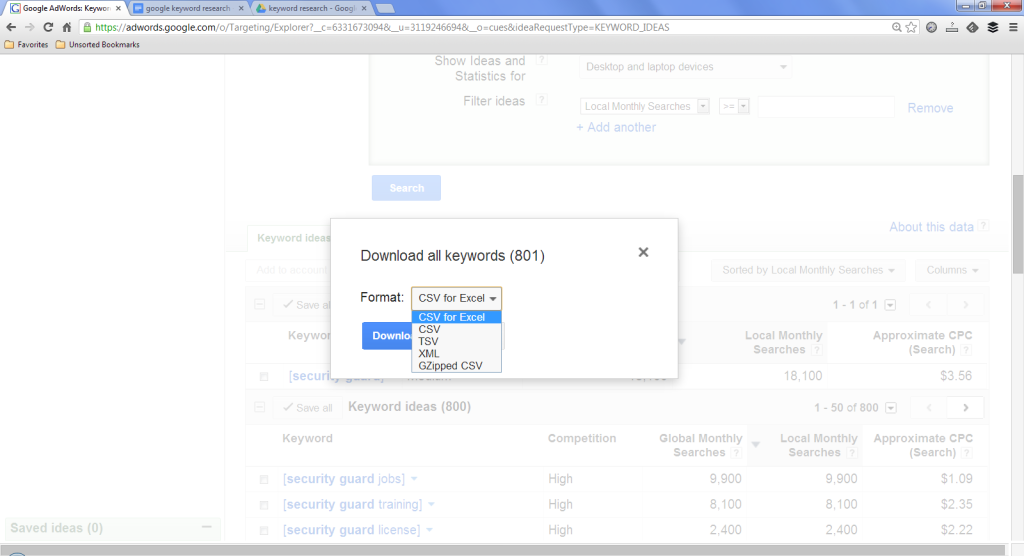
Step 7) Download. The next step is to download this data to your hard drive. You can choose the file format to download, I leave the default. You can zip it if will be a very large file. My CSV files always end up in my Downloads folder on my hard drive. It doesn’t really matter where it downloads to, as long as you can identify the folder in a few minutes. Click on the “Download” button, then click All Search Results.
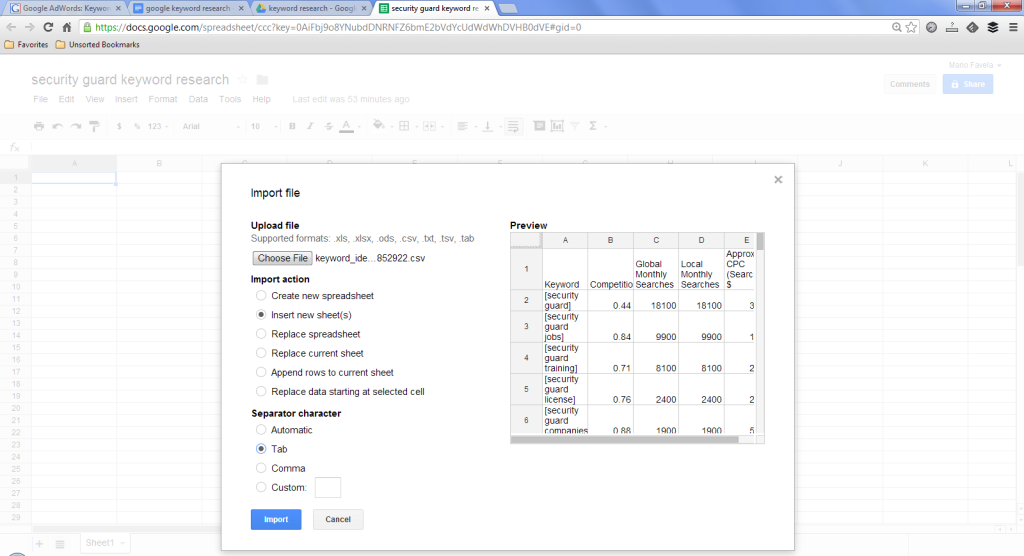
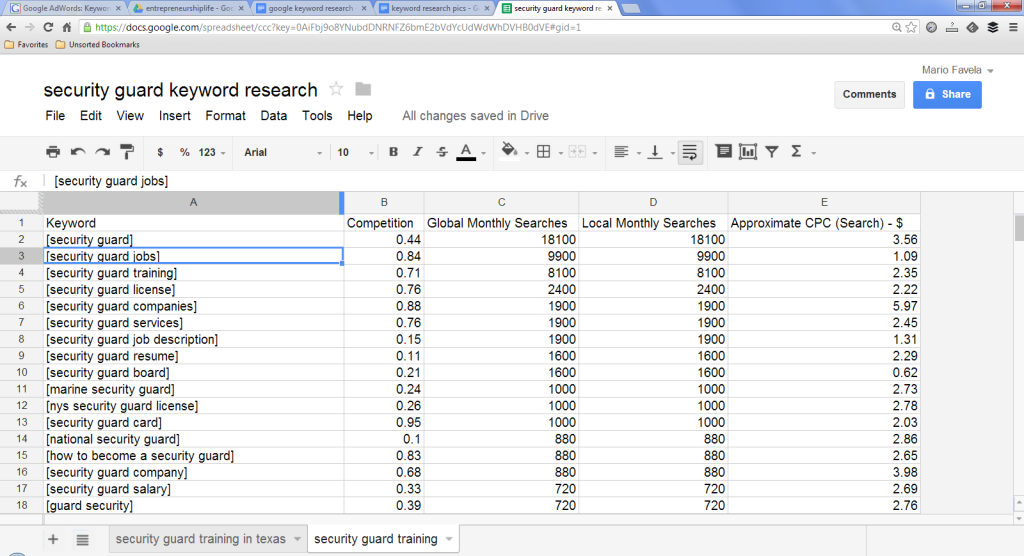
Step 8) Upload. Now you’ll need to upload the files back into your Google Docs spreadsheet. Open the spreadsheet. Under “Upload File,” find the same file you just downloaded. It’ll probably be in your “Downloads” folder on your computer. Then choose “Insert New Sheet(s)” under Import Action. Pick “Tab” under Separator character. Hit Import.
Step 9) Format the sheet. The last step is simple. Just re-name the new sheet like you would in an Excel spreadsheet. This helps to keep things organized when you have multiple sheets in one file. The data will be compressed or “squished” looking when you first import it. That’s easy to fix, just highlight the entire sheet by clicking the top right box. Then move your mouse between two columns until it turns into the double arrow…then click. The sheet will open up and it will be easier to read. You can also add new rows below your spreadsheet so you have more room to work.
Step 10) Organize your keywords. Now you can copy and paste your keyword groups. How you organize the groups is up to you, but it makes sense to identify similar phrases for post or site topic ideas.
Step 11) Rinse and repeat. If you have multiple keyword ideas for one blog or site, it’s easy to keep them all in Google Drive Just repeat the process outlined above until you have as many keyword groups as you like in your spreadsheet.
Step 12) Delete old sheets. Here’s one final step to make things easier…delete each individual spreadsheet from your hard drive after you download/upload it. That makes it easier to upload the newest one each time, since the spreadsheets don’t have easily identifiable names and can be easy to confuse.
So that’s it. A quick and free way to do your keyword research. Not everyone likes or trusts Google but for this kind of project, their tools are great. Once you get the hang of it you can make short work of finding lucrative keywords to drive traffic to your blog or website.
Have you ever research keywords for your site?


In addition to this tool – I use Google Trends to see the history and direction of a keyword. See: https://www.google.ca/trends/explore#cmpt=q
Nice! I’ll have to start using that as well.